This month's product spotlight is all about Smooch® Pearlized Accent Ink! Besides accenting stamped images, Smooch® Pearlized Accent Ink can be used on clay, jewelry pieces, wood, plastic, and more. The brush tip of the applicator (inside the lid) allows for precise application of the ink on any project. Our designers have created a diverse variety of projects in vastly different styles using these versatile pearlized inks - check it out below!
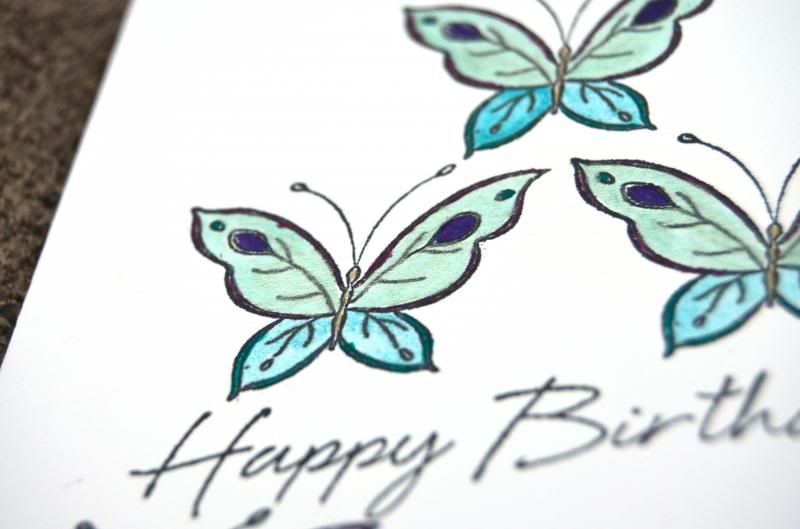
First up, is a card by Megan Aaron, highlighting the transparent effect that can achieved by applying Smooch® Pearlized Accent Ink over stamped images.
I love how Clearsnap's Smooch® Pearlized Accent Ink adds a little shimmer and dimension to stamped images, making these butterflies appear lifelike. Lighter colors of Clearsnap's Smooch® Pearlized Accent Ink are transparent so they can be applied right over top of the veins in the wings but the stamped details of the wings still show through the ink.
Supplies:
- Clearsnap Smooch® Pearlized Accent Ink in Pool, Frosted Aqua, Luscious Lime, Plum Twist and Ocean Soul
- ColorBox® Chalk Ink in Blackbird
- Impression Obsession (butterfly) and Hero Arts stamps
- Bazzill Cardstock
We're on a fun summer floral theme this month -- check out these gorgeous "Smooched" flowers by Sabrina Alery!
The small brushes that are included in the Smooch Accent Ink bottles are perfect for adding pearly details to stamped images! I added a touch to both the flower image and the hand-cut leaves for added interest.
Clearsnap Product
Smooch® Accent Ink - Orchid Frost, Bayside, Berry Punch
Smooch Glitz® - Mystified, Wildberry, Platinum
Colorbox® Chalk Cat's Eye® - Arctic Deep, Sea Crystal
Colorbox® Pigment Cat's Eye® - Ocean, Boysenberry
Top Boss® Watermark Ink Pad
Top Boss® Embossing Powder - White
Other Supplies
Cardstock - Bazzill Basics
Stamps - Stampendous
Embossing Folder - Sizzix
Adhesive - 3M, Bazzill Basics
My Blog: Sabrina Alery
Make a bold statement with Smooch Accent Ink on white cardstock - Jean shares how on this fab "hello" card:
Need a simple card? Let Smooch Accent Inks create a bright border of alliums on a quick summer card. Jean Okimoto here - with a super-fast Smooched design that blooms in just a few minutes. The embossed background makes it easy to add the rich metallic inks to the flowers and stems.
Stamp the Memory Box Allium Border on white cardstock with ColorBox Black Pigment Ink and emboss it with detail clear powder. Dot the Smooches onto an acrylic block. Spritz cotton swabs with water, pick up a tiny amount of ink and Smooch the blossoms with Sassy Pink, Orchid Frost, Bayside, Carrot, Sundance and Luscious Lime. Smooch the stems with Green Apple - keep clean cotton swabs handy to remove the excess ink along the sides of each stem.
Mat it with Peony Cardstock. Diecut the Memory Box Hello from Key Lime Cardstock. Add a square of Mango Cardstock. Attach everything to a Parchment Notecard, then punch three accents holes below the greeting. Thanks for visiting - enjoy the Smooched projects we're sharing today!
And finally, a "Smoochy", carefree & artful scrapbook page by Suzanne Austin!!!
I absolutely LOVE the entire line of Clearsnap Smooch Inks! I love the permanency and flexibility of these inks which make them super fun to play and create with!
I created this "watercolor" layout using Smooch Accent Inks and ColorBox Acrchival Dye Ink. Using Smooch Accent Inks in "Aqua Frost, Spruce, and Bayside" with water, I was able to achieve the watercolor background by layering the inks to create interest and depth (with a paintbrush). I also used Smooch Accent Ink in "Tuxedo" (also mixed with water) to create the black splatters. The butterflies were stamped with an oldie but goodie and one of my new favorites-ColorBox Archival Dye Ink in "Seattle Sky." These were actually stamped first...I lost a tiny bit of detail when I applied the other Smooch Accent Inks but was able to fill those areas back in using Smooch Accent Ink in "Silver Fox" (the nib brush tip works excellent for the fine detail work!).
The striped pattern under the photo has been stamped with ColorBox Archival Ink in "Wicked Black"..an absolute MUST for me when I create mixed-media layouts!
The coolest thing-the shimmer in these inks are not compromised one bit even with diluting them with water! So not only are you able to achieve watercolor effects, you can also achieve shimmery watercolor effects!
Clearsnap Supplies: Other Supplies:
Cotton rag paper
       |


No comments:
Post a Comment