We're so excited to be teaming up with our friend Susan K. Weckesser and her team this week. We first met Susan at a trade show a few years back -- her happy smile, whimsical art, and joy for life were so contagious, we connected with her from the get-go!
All week long, our team members will be creating using Clearsnap inks, sprays, and more + Susan's paper by Want2Scrap, stencils by Want2Scrap, and stamps by Unity. Stop by every day for new inspiration....
Today, Creative Team Member Megan Aaron shares a fab flower tutorial video:
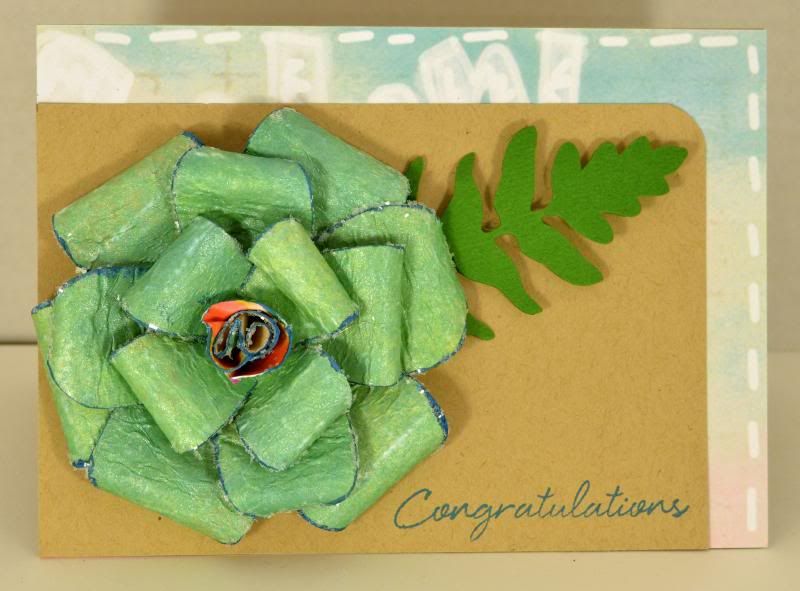
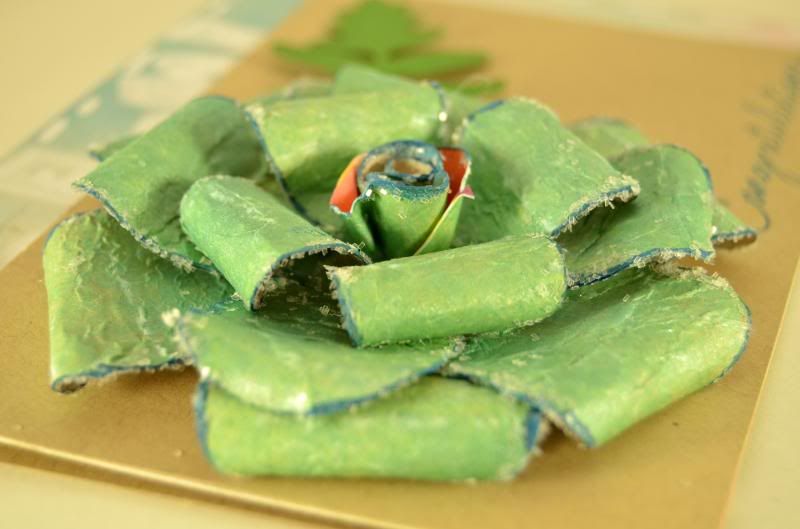
Today I am excited to show you a fun technique for making a flower that you can use on a card or any other craft. Here is the flower on a finished card. I used paper from Susan Weckesser, Clearsnap Smooch Spritz, Mix'd Media Chox Inx by Donna Salazar for Clearsnap, and Sprinkles Chunky glitter by Stephanie Barnard for Clearsnap.
Can you spy the Sprinkles! Chunky Glitter along the edges of the petals?
Here is a tutorial video that I created to share how to create these flowers from Susan K. Weckesser's gorgeous patterned paper line -- it's easier than you might think!
Clearsnap Product:
- Mix'd Media Inx™ Chox Inx by Donna Salazar for Clearsnap in Bluejay
- Clearsnap Smooch Spritz® in Vanilla Shimmer and River Mossy
- Sprinkle! Chunky Glitter by Stephanie Barnard for Clearsnap
- Susan Weckesser patterned paper
- Bazzill Cardstock
- glue stick
- hot glue gun
And, Social Media Coordinator Jennifer Priest shares a fun mixed media style card!
Painted words look so pretty, carefree, and happy, yet, I am kind of intimidated to paint words on my own. Enter Susan K. Weckesser's "Painted Sentiments" Stamp Set by Unity Stamp Company! Susan painted these words and then created a stamp set with them--stamping them makes it look like I painted the words...which is pretty nifty, if you ask me!
To create this card, I stamped the word "inspire" in the center of a piece of leftover product packaging (from flowers I used on another project). The glossy nature of most product packaging makes it a nice surface for blending inks. I used a ColorBox® Stylus and Tips Set to blend the Mix'd Media Inx™ in Wisteria into the paper, creating an ombre effect towards the bottom of the card. I added a little bit of Mix'd Media Inx™ in Stormy to the bottom and top edges of the card to enhance the ombre effect.
Next, I re-stamped the word "Inspire" using the "Painted Sentiments" stamp set and Mix'd Media Inx™ in Wisteria, again. I used a heat gun to set the ink as I was finished blending and wanted the stamped image to stay crisp - without heat setting, the pigment ink molecules would be sitting on top of the paper fibers and would smudge if touched.
To create the card base, I folded a 5.5" x 8.5" piece of white cardstock in half to create an A2 card. I stamped a border around the card using Viva Las Vegastamps! Design/Tight
Curlyques 1 3/4 x 1 3/4 Item 9795 and Mix'd Media Inx™ in Denim. I then sprinkled the stamped border with Mix'd Media Inx® Embossing Powder in Peridot and Clearsnap Glitter in Twinkling Turquoise Heat setting the embossing powder helped to keep the glitter in place.
Next, I adhered the card front to the base, adding a band of measuring tape and washi tape across the bottom. A button, teardrop flat back pearl, and felt heart diecut (Sizzix) were added for interest.
As a finishing touch, I shook a Smooch Spritz® by Donna Salazar in Peaches & Cream well and then removed the sprayer. I placed the card into a Color Catcher® to protect my work area from any stray ink splatter. By tapping the straw end of the srapyer with my finger, angled down towards the card, the ink splattered onto the card. I then used a heat gun to set the ink. And now, this card is ready to inspire whoever it is sent to!
Clearsnap Product:
- Mix'd Media Inx™ in Wisteria, Denim, and Stormy
- Smooch Spritz® by Donna Salazar in Peaches & Cream
- ColorBox® Stylus and Tips Set
- Glitter in Twinkling Turquoise
- Mix'd Media Inx® Embossing Powder in Peridot
- Color Catcher®
Other Supplies:
- Susan K. Weckesser's "Painted Sentiments" Stamp Set by Unity Stamp Company
- Bazzill Cardstock in Coconut Swirl
- Viva Las Vegastamps! Design/Tight Curlyques 1 3/4 x 1 3/4 Item 9795
- Washi Tape
- Measuring Tape
- Product Packaging
- Heat Gun
Now, head on over to Susan's blog to see what her team created: http://mysweetearth.blogspot.com/
Thanks for stopping by! If you enjoyed today's post, please subscribe to our blog and follow us on the following social networks for even more inky inspiration:


Two great projects. That flower would be fun for my students to make for their Mother's Day cards.
ReplyDeleteI like the clock card. It's really interesting---good for a guy.
ReplyDeletegreat tutorial Megan!!! love BOTH of these awesome projects!
ReplyDeleteWhat a luscious flower! Love the color (so rich) and the sparkle is yummy! The card is delightful with that versatile look! TFS!
ReplyDeleteLove that luscious flower! The glitter adds just the right touch of sparkle to it! The colors on the clock card are so rich looking! TFS!
ReplyDeleteBoth projects are wonderful! Thanks for the tutorial for the flower. I really love the card!
ReplyDelete